#Remove existing Printer Settings
Explore tagged Tumblr posts
Visit Tumblr Blog
Explore Tumblr blogs with no restrictions, modern design and the best experience.
Last Seen Tumblr Blogs


Fun Fact
The Tumblr app for Google Glass was released on May 16, 2013.
Text
Beckford World- Beta
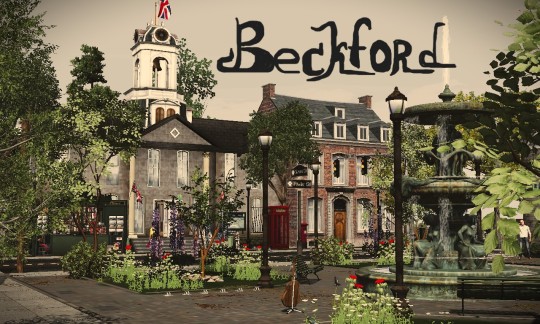
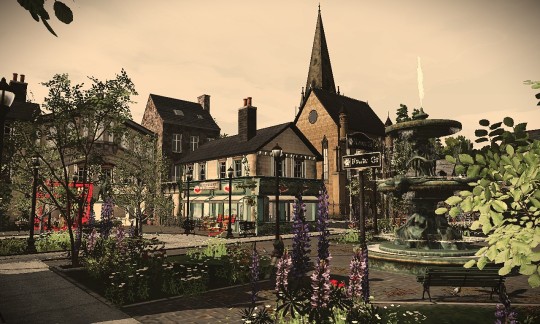
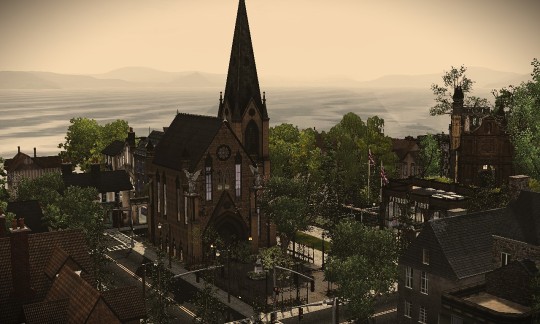

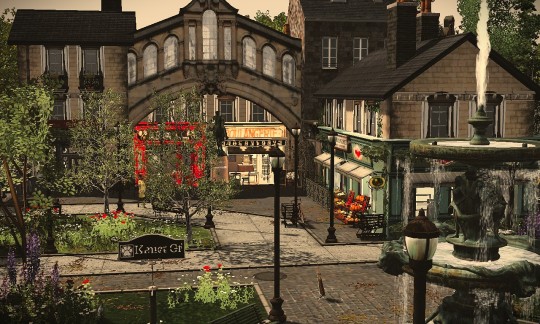
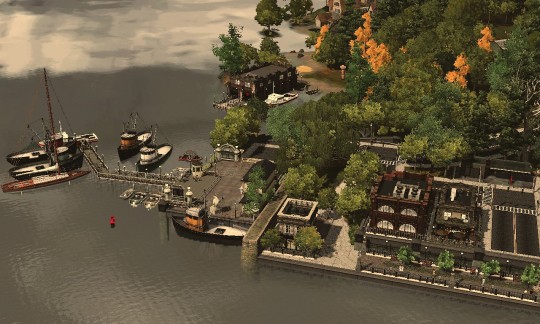
Beckford is a secluded English town situated on a picturesque little island that radiates warmth and cosiness. The central square with its fountain is surrounded by cosy cafes and shops, where locals and tourists alike can enjoy a cup of fragrant tea or coffee from the comfort of the sunny terraces. The old harbour, with its moored boats and quiet streets, invites for leisurely strolls and romantic evenings by the water. The promenade, lined with flowering shrubs and benches, offers beautiful views of the ocean and sunsets, creating an atmosphere of privacy and tranquillity. The majestic cathedral with its tall towers and the cosy old castle become the real gems of Beckford, awe-inspiring not only for their historical significance but also for the atmosphere of warmth that surrounds them. Beckford is the perfect place for those who want to escape from the hustle and bustle and enjoy the simple pleasures of life surrounded by nature and friendly people.
This world-Edit Hylewood by the amazing @nilxis,credit for the terrain and plant placement goes to them.Then the world was redone by one of my favourite creators @Gruesim so the replacement texture roads are to her credit. The world has 27 public lots and 16 residential lots. Stor sets are present in the world! They are included in the download in package format,also in the build there are fixes for these sets.Please read the document inside on how to properly install the Stor fixes in PACKAGE format!!!!
Also in the world there are some mods that you can download from these links: 1.Mod functional printer 2.Tennis court mod 3.Mod purchase from inventory 4.Mod More vending machine fods 5.Mod system of petrol use by cars 6.post mod 7.Shop for clothing display pedestal mod 8.Social clubs mod
9.Private Clinic Psychiatry
10.Get Pumped
11.Yoga mod
12.Spin Class by Twinsimming
Recommendations for optimising the world. I advise and even insist that you use with this world mods Nraas:Master controller,nraas Overwatch,nraas Register,nraas Traffic.(Links to them do not give, I think they have you and so all installed):)Optimise the world with these mods: remove unnecessary transport, generated by the game stray animals, paparazzi and tourists. The world is released in betta version as it was little tested (and I will not have such an opportunity in the near future, so I put it out to you earlier than planned).
Download World
Download (mirror)
Download(mirror 2)
Download CC
(Download mirror сс)
Download (mirror cc 2)
If you have any questions, please write to us and we will solve them together. Gratitude I would like to thank all the wonderful creators I used for this world! Without you I would have nothing and this world would not exist. Thank you so much for your hard work! @Phoebejaysims,@Grandelama,@Martassimsbook,@aelisinsims,@Analogica 40,@Gruesim,@aroundthesims3,@bioniczombie,@Noir and dark sims,@simaddix,@wanberlust-pixel,@zivas-blog,@mequestrianequipment,@syninplays,@olomaya,@omedievalpixel,@kerrigan house designs,@Mspoodle. Sorry who I forgot )
If you want to thank me, buy me a coffee.
549 notes
·
View notes
Text
TECHNOLOGIC
TECHNOLOGIC, d4ffft, 2018
People will license the oddest things.
TECHNOLOGIC (capitals mandatory) is an RPG based on the work of Daft Punk. It's a cyberware game, but not cyberpunk, despite the name of the band. Your characters have quit their grinding day-to-day office or factory jobs, and are now traveling through a slightly trippy, slightly eccentric world to find meaning in their lives.
Attributes are, of course, Harder, Better, Faster, and Stronger. The last two are self-explanatory. Harder is the social attribute, and Better is the mental one.
Skills are taken from the title track, as it were. There's Buy It (wealth), Fix It (repair), Print It (crafting via 3d printers), Leave It (running), Pause It (for distracting people from what they're doing), Work It (sex appeal), etc. Some of them are overly broad, like Use It, which applies to almost all tech in a tech-heavy game, or overly narrow, like Jam-Unlock It in a game with no breakdown rules.
The game engine is very matrix-driven. It's actually pretty reminiscent of the FASERIP success table, if you're familiar with that. You roll, cross-index your stat and your opponent's stat, and end up with a colored result. From best to worst, the results are Fuchsia, Magenta, Indigo, Azure, Teal, and Lime. The first table might get you your final result, or it might tell you to roll on a second table. That might or might not send you to a third table. You get a handful of Get Lucky points, which can move you up to +3 shifts on your color result. The game has a mild "death spiral" (not that combat is a big part of the game), and penalties you pick up from Indigo or Azure successes slowly mean that you get a Fuchsia result and are out of the action.
I gave it a dozen or so rolls, and it seemed to work fine, but I feel like it's too much. It takes too long to resolve, and it takes too many rolls to get the final outcome. You could get the same results with a single, much simpler table and a d100 roll, or maybe contested d20 rolls and using the difference to determine success.
As the game progresses you pick up "Fragments of Time", which are moments that are particularly meaningful to your character. These serve multiple purposes:
They provide roleplaying fodder for how your character should act toward and react to other people.
They provide you a set of Get Lucky points that you can use in situations related to those specific moments
Adding or removing a Fragment gives you XP to spend.
That's probably my favorite part of the game. Those of you who have heard me wax rhapsodic about Tenra Bansho Zero and its marvelous character development mechanics probably guessed that already. (Seriously, read TBZ, the Kiai / Aiki / Fates / Karma loop is my favorite.)
Sadly, the book contains no art. The layout is decent, but apparently while d4ffft got permission to use lyrics and song titles they didn't manage to secure the rights to any imagery and decided to just go to press without it (which, fair). This is one of the few books I feel like could benefit from some early 2000s Poser art. It just feels like the exact right venue for it, you know? Put in some badly rendered metallic scenery with an overly-smooth facsimile of a human being.
@chubbycrowgames made a quick random character generator, so if you do happen to pick up TECHNOLOGIC there's some existing support for it.
#ttrpg#imaginary#indie ttrpg#rpg#review#chubby crow actually made this whole thing up#you can't blame me for this one#ok that's not true i am notoriously blameable#but they came up with the idea this time
32 notes
·
View notes
Text
Ortho Updated Facts Part 14: Ortho's Gear (pt3)
In Book 7 Ortho observes that, as something that exists outside of the natural world, his will cannot be overwritten by Malleus’ magic as long as the technomantic reactor that acts as his heart remains operational.


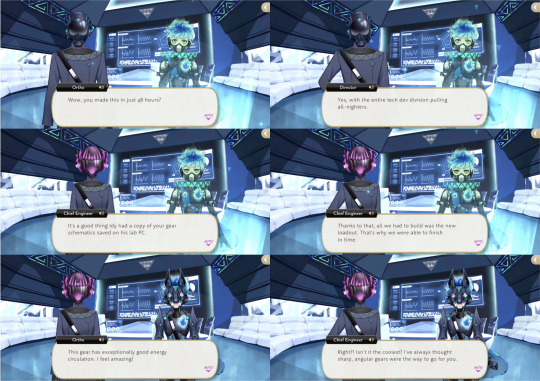
None of his gear works within Malleus’ domain, leading to his mother designing “anti-magical disaster gear” that specializes in “combat within areas affected by magic, and it can defend against system contamination caused by Malleus's spell,” which she names the Cerberus Gear.
Based on a copy of Ortho’s schematics that Idia had saved to his lab computer, the gear was created in 48 hours by STYX’s tech development division. Ortho says that it has “exceptionally good energy circulation.”
The Cerberus gear is accompanied by two support droids on its first mission for use in exploration and combat, but the Chief Engineer warns that it can only operate within Malleus’ domain for 20 minutes.


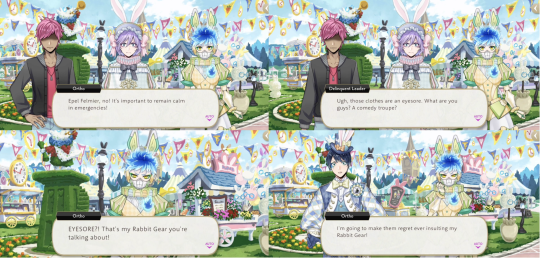
Ortho is unable to wear any of the White Rabbit costumes provided by Deuce’s mother, saying that he would need proper machinery with a 3D printer.


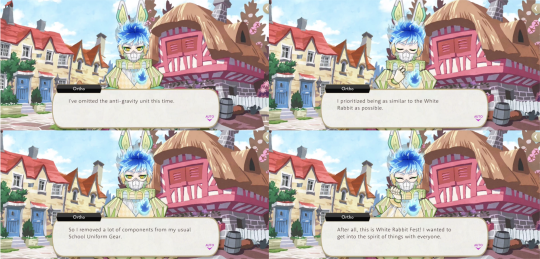
Deuce takes him to a nearby blastcycle workshop and Ortho both designs and crafts his Rabbit Gear on his own, prioritizing “being as similar to the White Rabbit” as possible.
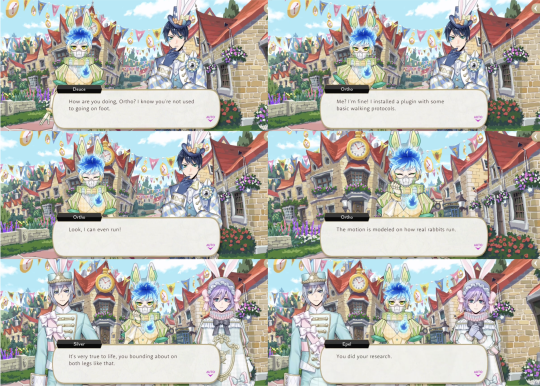
He still retains his vital signs scanning but replacing his antigravity component with the ability to walk, run and jump. He is also still capable of taking photos, but having removed his laser he breaks apart a sausage for the time into different pieces with his fingers, to their surprise.


After telling Epel that it is important to remain calm in emergencies Ortho becomes enraged at an insult to his Rabbit Gear, and making the bully regret his insult becomes his driving motivation for the Rabbit Run race during the White Rabbit Fes event.


Having removed his the gear’s flight capability he jumps out of a trap that he gets knocked into by another bully, resulting in a crack to the gear’s exterior casing: “I didn't have time to let it properly set after casting the mold, so the polymer isn't as strong as it could be…”

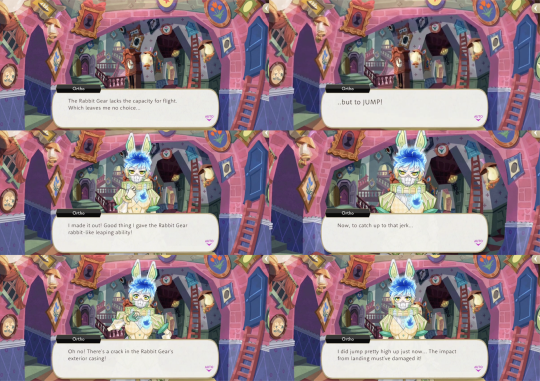

The internals also suffer damage, throwing off his equilibrium and causing him to stumble for what is maybe the first time in his robot-life: “So this is what it's like to lose your sense of balance…”


He gathers data during the race regarding what features his design is lacking and reworks it after returning to NRC, installing an antigravity unit, high-speed movement, flight, a laser and Rabbit Mimic mode based on rabbits that Silver introduces him to.


36 notes
·
View notes
Text

Usability: Great RPG Mechanics #RPGMechanics: Week Nine
Continuing my week of meta-elements which make for great games, I want to talk about physical presentation. There’s a weird mix in my collection of ttrpgs. I have 8-9 shelves filled with physical books and way, way too many accumulated in my badly organized “rpg e-files” folder which has migrated across five different desktops. I’d say pdfs have become the majority at this point. I usually read those on a crappy Samsung tablet, mostly because I have a hard time reading large amounts of text on a screen. So pdfs work better than others– and I appreciate when the designers have thought about these elements.
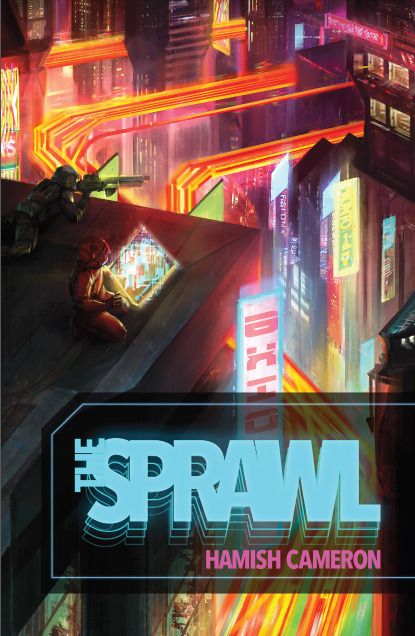
Printer-Friendly: I love it when a ttrpg has a printer friendly mode. This can take a couple of forms. Some games, like The Sprawl, have a day-mode and night-mode versions. When I first saw the Sprawl’s white text on black background, I didn’t like it. Eventually I found out that was a more comfortable approach for a lot of readers. But I appreciated that Hamish Cameron eventually released a version with standard black on white page design. Other games publishers in the last few years have begun to do this more and more. Star Trek Adventures includes that with the pdf purchase.
The other version of printer/reader friendly is to have layers available in the pdf. This allows readers to turn off distracting page elements: paper textures, watermark art, intrusive page frames. This allows for easier printing, but frankly for me, it makes for easier reading. It just makes me unreasonably angry when I get a pdf with page backgrounds that make it harder for my old person's eyes and I can’t turn those off. Sometimes a pdf will have layers but turning off the backgrounds removes the text as well because they’ve merged the two together. The best games have layers, cleanly separated and cleanly labeled.
Give Me Text: Some games in recent years have offered text-only versions, like The Veil. I love this. It is hugely useful and makes it more likely that I’m going to run that game. I run the majority of my ttrpgs online. Usually that means I’m putting together materials for the players: setting background, cheat sheets, and character keepers. Extracting text from pdfs is a pain, even with a good program. You almost always have to deal with the paragraph breaks and formatting. When a company provides the text, it makes my job significantly easier. If you want people to play your game online, outside of a set VTT package, include the text with the pdf. A lot of folks on itch.io know to do this.
Accessibility: There are a couple of elements which I can’t speak to from experience, but I appreciate when I hear about publishers who spend the extra time getting these things right. My father was color blind and the few board games he played with us often had to be modified to make up for that. Some companies use online tools to check how their material works for the color blind. That’s important where color is used to mark out important information: particularly different colors to indicate different things.
On the other hand, one complaint I’ve heard about certain books is that they’re particularly dyslexia-unfriendly. They choose fonts which look cool but become a pain to actually read for people with this condition. I know tools and resources exist for checking which fonts work better than others. Of course it isn’t just about fonts, but general typographic elements, size, background bits, etc. When I designed the earlier Gauntlet Community revised logos, I had input from a couple of folks who encouraged me to move clutter away from the words and remove some extra type flourishes. It looked better and became more useful as a result.
6 notes
·
View notes
Text
How to Scan, Edit, and Print: Mastering 3D Scanning for 3D Printing
The world of 3D printing is a creative playground where imagination meets technology. However, many makers and hobbyists are now discovering that 3D scanning can be just as important as 3D printing itself. With the ability to capture real-world objects and turn them into digital 3D models, 3D scanning opens up new possibilities for customization, repair, and innovation. In this blog, we’ll guide you through the steps of scanning, editing, and printing your own creations using 3D scanning technology.

Step 1: Scanning – Capturing Your Object
The first step in using 3D scanning for printing is to capture the physical object. Whether you want to replicate an existing item or modify it for a new purpose, 3D scanning allows you to easily digitize the physical world.
To start scanning, you’ll need a 3D scanner. There are various types available, ranging from handheld scanners to stationary ones, depending on the complexity and size of the object you wish to scan. Handheld scanners are excellent for scanning smaller objects, while more advanced desktop 3D scanners can handle larger or more intricate items.
When scanning, it’s essential to ensure the object is well-lit and stable to avoid inaccuracies. Move the scanner around the object to capture its full geometry, paying special attention to the details that matter most. Some 3D scanners come with software that automatically stitches the scan together, while others may require manual adjustments to ensure the model is complete.
Step 2: Editing – Refining Your 3D Model
Once you’ve captured your object, the next step is editing. Raw 3D scans often need a little touch-up to ensure they’re ready for printing. This stage allows you to modify the model to suit your needs.
There are several tools and software options available for editing your 3D scans. Programs like Meshmixer, Blender, and Autodesk Fusion 360 provide powerful features to clean up models, remove any unwanted artifacts, and add or adjust features. You can fix issues such as holes or gaps in the mesh, smooth out rough surfaces, or even resize and scale the model.
One of the great things about editing a 3D scan is that you can add custom modifications to your model. Whether you’re enhancing a part, combining multiple scans into one object, or designing something completely new based on your scanned model, the possibilities are limitless. You can even make slight tweaks to the design to improve functionality or aesthetics before printing.
Step 3: Printing – Bringing Your Digital Model to Life
Now that you have a refined 3D model, it’s time to bring it to life with your 3D printer. Before you hit "print," there are a few things to keep in mind to ensure your model prints successfully.
Start by checking the file format. Most 3D printers work with STL or OBJ files, which are common formats for 3D printing. If your scan is in a different format, you may need to convert it using software like MeshLab or Netfabb.
Next, choose the right print settings for your project. Consider the material you're using (PLA, ABS, resin, etc.) and adjust the print settings, such as print speed, layer height, and infill density, to match the requirements of your design. The quality of the print can vary greatly depending on these settings, so make sure to fine-tune them based on your object’s complexity.
Don’t forget to check for any print issues before starting. This includes ensuring the printer bed is level and the filament is loaded correctly. Once everything is ready, hit "start," and watch your model take shape layer by layer.
Step 4: Post-Processing – Finishing Your Print
After your object is printed, you’ll likely need to do some post-processing to achieve a smooth, professional finish. This could include removing any support structures, sanding the surface, or adding paint for a polished look.
For items printed with resin, you may need to cure the print under UV light to harden it further. Other finishing techniques may include smoothing rough edges, filling in imperfections, or even assembling parts if your model consists of multiple components.
While post-processing can take time, it’s essential for ensuring the final product looks its best. It’s also a great opportunity to personalize your printed objects even further.
Why Mastering 3D Scanning Is Essential for Makers
Mastering the process of scanning, editing, and printing with 3D technology offers incredible advantages to makers, hobbyists, and inventors. By combining 3D scanning with 3D printing, you can create custom parts, repair broken objects, and explore an entirely new world of design possibilities. The ability to easily capture real-world objects, tweak them digitally, and print them with precision makes this combination of technologies indispensable for anyone passionate about creating.
With 3D scanning and printing, the creative possibilities are endless. By learning how to scan, edit, and print, you’ll be able to bring your ideas to life in ways that weren’t possible before. Whether you’re recreating a lost part, customizing a design, or building something entirely new, mastering 3D scanning for 3D printing opens up a world of opportunities for makers everywhere. Don’t just imagine your creations—bring them to life!
1 note
·
View note
Text
home it support dubai,
home it support dubai,
In today’s fast-paced digital world, technology has become an integral part of our daily lives. Whether you're working from home, streaming your favorite shows, or managing household devices, a stable and efficient IT infrastructure is essential. However, not everyone is tech-savvy, and troubleshooting can be a daunting task. This is where professional home IT support services in Dubai come into play, ensuring your technology runs smoothly and efficiently.
What is Home IT Support?
Home IT support refers to a range of technology services designed to meet the needs of individual households. These services include everything from setting up and maintaining home networks, managing devices, and troubleshooting issues to installing software, securing systems, and providing ongoing support. Whether you're facing connectivity issues, setting up a home office, or need assistance with data security, home IT support in Dubai offers tailored solutions to resolve these challenges.
Why Choose Home IT Support in Dubai?
Dubai is known for its rapid technological advancements and high-tech lifestyle, making reliable IT support a must-have for many homeowners. Here’s why opting for professional IT support at home can be beneficial:
Expert Assistance: IT professionals are equipped with the expertise to solve technical issues quickly and efficiently. From installing complex software to configuring routers, they bring a level of skill that most people do not possess.
Time-Saving: Instead of spending hours trying to fix technical problems on your own, IT support specialists can resolve issues in no time, allowing you to focus on what matters most.
Enhanced Security: With rising concerns over cyber threats, home IT support services often include security features such as antivirus installation, firewall setup, and data encryption to safeguard your personal information.
Tailored Solutions: Each household has unique needs. Whether you have a smart home setup, multiple devices, or a home office, IT support services offer solutions tailored to your specific requirements.
Cost-Effective: While it might seem like an extra expense, hiring an IT expert can save money in the long run by preventing costly repairs and unnecessary purchases.
Common Home IT Support Services
Network Setup & Optimization: A strong, stable Wi-Fi connection is essential for a smooth experience. IT experts can help with router setup, network configuration, and Wi-Fi optimization to ensure high-speed internet access across the home.
Home Office Setup: With the rise of remote work, setting up an efficient home office has become crucial. IT professionals can assist with setting up computers, printers, webcams, and software, as well as ensuring the security and smooth operation of your home office network.
Device Integration: Modern homes feature a variety of devices—smartphones, laptops, tablets, smart TVs, and home automation systems. IT support services can ensure that all your devices work seamlessly together, providing you with a cohesive experience.
Troubleshooting & Technical Support: Whether it’s a computer that won’t boot up, a printer that’s malfunctioning, or an internet connection that’s constantly dropping, home IT support offers expert troubleshooting to fix technical glitches quickly.
Data Recovery & Backup: Losing important data can be devastating. IT support providers often offer data backup and recovery services, ensuring your personal or work data is safely stored and easily retrievable in case of a system failure.
Cybersecurity & Virus Removal: Protecting your devices from malware, spyware, and other cyber threats is crucial. IT support services can install firewalls, anti-virus software, and other security measures to safeguard your digital life.
Software Installation & Updates: Installing the latest software or updating your existing programs can often be a headache. Home IT support ensures that everything is up-to-date, secure, and functioning properly.
Choosing the Right IT Support Provider in Dubai
Selecting the right IT support provider for your home requires careful consideration. Here are some factors to keep in mind:
Experience & Expertise: Ensure the IT provider has a proven track record and expertise in handling the specific issues you need assistance with. Look for certifications and client testimonials to gauge their capabilities.
24/7 Availability: Technology issues can arise at any time, so having access to round-the-clock support is a great advantage.
Affordability: While IT support is an investment, make sure the pricing is transparent and competitive. Some providers offer packages for specific services, while others provide all-in-one solutions.
Customer Service: Good customer service is essential. Choose a provider that offers friendly, reliable, and efficient support, as this will ensure a better overall experience.
Reputation: Look for companies with a solid reputation and positive reviews. A reliable provider will have a strong track record of helping homeowners resolve IT issues.
Conclusion
In a city like Dubai, where technology plays a central role in daily life, home IT support services are more important than ever. Whether you’re dealing with slow internet, setting up a new home office, or ensuring your devices are secure, professional IT support can save you time, hassle, and money. With expert services tailored to your specific needs, you can ensure that your home technology remains in top shape, allowing you to enjoy a seamless digital experience.
4o mini
0 notes
Text
How to Print DTF Transfers: Tips for Long-Lasting Designs

DTF (direct-to-film) printing is revolutionizing the printing industry, offering vibrant and durable designs on various materials, including cotton, nylon, and leather. Unlike sublimation, which is limited to polyester, DTF can handle a broader range of fabrics. If you're ready to dive into DTF transfers, this guide will walk you through the process step-by-step, ensuring your designs last.
What You’ll Need for DTF Printing
Before you start, gather these essential tools:
Best DTF Printer: Choose a printer specifically designed for DTF, or consider converting an existing inkjet printer.
DTF Transfer Film: This is the medium where your design will be printed.
DTF Ink: Specialized ink that adheres to the film and bonds with the fabric.
Curing Powder: This adhesive ensures your design stays on the fabric during the transfer process.
Heating Press or DTF Oven: These apply the necessary heat and pressure to bond your design to the fabric.
RIP Software: This software prepares your designs for printing, ensuring accurate color layering.
Step-by-Step Guide to Print DTF Transfers
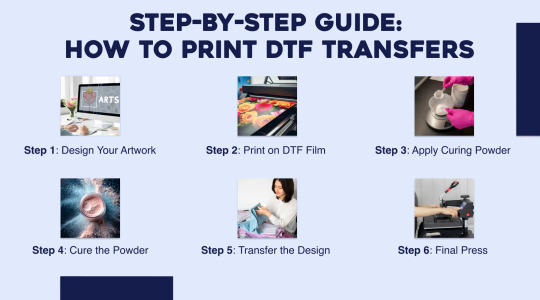
Step 1: Design Your Artwork
Use graphic design software like Adobe Illustrator or Photoshop to create your design. For dark fabrics, ensure to include a white layer when printing. Once you're satisfied with the design, it's time to print.
Step 2: Print on DTF Film
Load the DTF transfer film into your printer. Print your artwork using DTF ink, following the order: colors first, then an uncolored layer. If using a converted inkjet printer, make sure it’s properly set up for DTF printing.
Step 3: Apply Curing Powder
Also Read: What Does DTF Transfer Mean?
While the ink is still damp, sprinkle curing powder evenly over the design. This step is crucial for ensuring the image adheres to the fabric.
Step 4: Cure the Powder
Using a DTF oven or heat press, heat the printed film at about 325°F (163°C) for 2 to 3 minutes. This step transforms the curing powder into an effective adhesive.
Step 5: Transfer the Design
Once the powder is cured, place the design on your garment. Set your heat press to around 320°F and apply pressure for 15-20 seconds. Allow the fabric to cool slightly before peeling off the film.
Step 6: Final Press
For added durability, give your fabric another press. Place a piece of parchment over the design and press for an additional 10-15 seconds. This helps embed the design into the fabric, enhancing its longevity.
Tips for Long-Lasting DTF Transfers

Use High-Quality Ink: Invest in DTF-specific ink to prevent faded colors and ensure vibrant prints.
Store Curing Powder Properly: Keep it in a dry place to avoid clumping, which can affect adhesion.
Ensure Even Heat and Pressure: Consistent temperature and pressure are key to achieving smooth, durable designs.
Never Skip the Final Press: This step significantly boosts the durability of your design, helping it withstand multiple washes.
Choosing the Right DTF Printer
For beginners, selecting the right printer can be daunting. While dedicated DTF printers are available, many opt to convert existing inkjet printers like the Epson L1800 or P600. Ensure your chosen printer is compatible with DTF films and inks, and look for models with good customer support and availability of replacement parts.
DTF Printing vs. Other Methods
Also Read: What Kind of Printer Do I Need for DTF Transfers?
Screen Printing: Ideal for large orders but labor-intensive and costly for intricate designs. DTF allows for quick, smaller batches.
Sublimation Printing: Limited to polyester and lighter colors; DTF works on various fabrics and is effective on dark materials due to its white ink layer.
DTG Printing: While DTG offers a soft finish, it requires pre-treatment of fabric. DTF simplifies the process, making it more user-friendly for beginners. Also Read: How to Remove DTF from a Shirt Without Ruining the Fabric
DTF printing is a versatile, easy method for creating vibrant designs on various fabrics. Whether you’re a novice or a seasoned pro, with the right tools and a bit of practice, you can produce stunning, long-lasting transfers.
Ready to start creating your DTFIL transfers? Explore your options and bring your designs to life with ease!
0 notes
Link
0 notes
Text
To ensure the ultimate immortal society never becomes complacent, give them very difficult multi-generational long term goals to work towards. that influences what people want to be when they grow up.
Example:
Not just to sustain but improve Society.
Solve famine.
Space elevators, space tether space hook.
Purfect Education, Lifelong learning and Individual growth.
Perfect communication, not just one that “works”, communicates emotions and Information using inscriptions, sounds, body gestures, telepathy, in the most effective way. maybe Synesthesianese?
Gravity manipulation, like zero gravity technically. a true Tractor beam.
Matter Synthesizer 3D deconstructor and 3D printer, matter deconstructor to get the fundamental components to 3D print anything and everything: inorganic, organic, food, Replacement of body parts, organs, bones, intricate cybernetic augmentation, utilizing precision gravity manipulation technology. 3D printed Skin healing beam.
A way to keep people in top physical condition in any environment, especially preventing muscle atrophy in low gravity.
Cryo sleeps for space travel.
Chemical preservation or just organic preservatives like some kind of GMO fungus?
Remove all the harmful genetic disorders.
find Immortality of some kind,
End aging at least.
VR full dive nerve gear, simulation.
Mind uploading.
Perfect AI Artificial Intelligence.
Improve Renewable energy sources.
Use only Renewable energy.
Better Superconductors, more efficient Energy storage and transportation.
Dyson sphere or Dyson swarm to harness all the energy from the star.
Fusion reaction electric generator for more efficient energy for space travel. running on Hydrogen and oxygen, the fuel that could be harvested in space.
F.T.L. Faster Than Light travel.
Genetically engineered perfect life form and perfect humanoid life form, or something else.
Very powerful weapons, death star,
nanomachines, autonomes, battle robots, but be careful.
Dimensional wormholes.
Time travel.
prove or disprove God, or spirituality and consciousness like the existence of a soul.
Set new goals as we learn new unknowns, To infinity and beyond!
0 notes
Text
Update 6 and Repair 3- Big holes and little holes: April 2024
Pretty busy month so far, and at the time of writing we're only 6 days in.

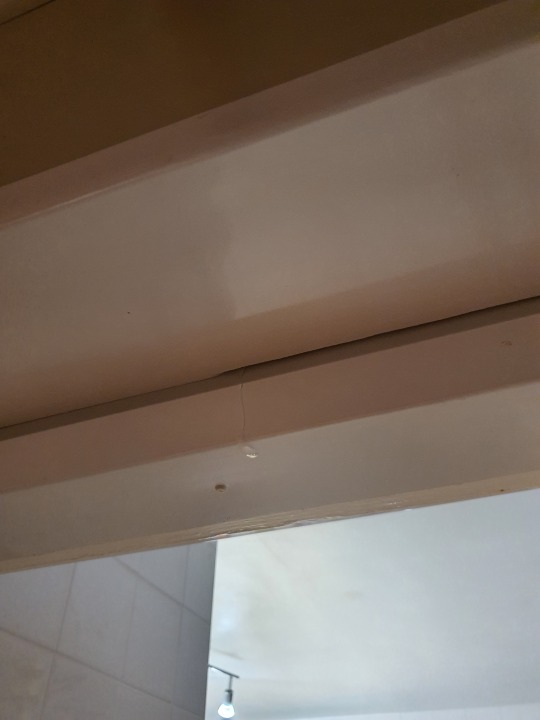
Firstly, I want to be able to utilise the loft space more for storage. However, the loft hatch was only just big enough to climb through, let alone carry items up into it too.
So i bought a loft hatch kit, with an extended hatch size and a ladder attached to it.
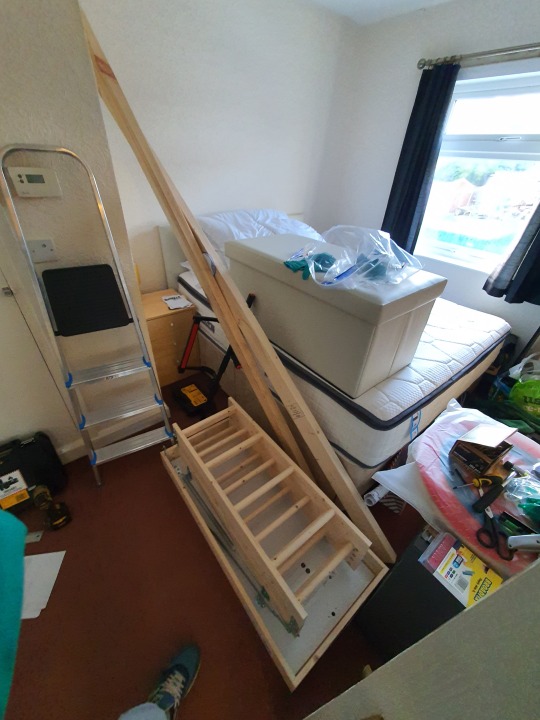
My manager, MD, offered to help me with the process of cutting out the ceiling, cutting out the joists, re-bracing it all and then securing the hatch into the ceiling.
We started by removing the existing wood/joists that framed the old hatch, and then we cut out the sections of joist that would need to be removed for the new hatch.
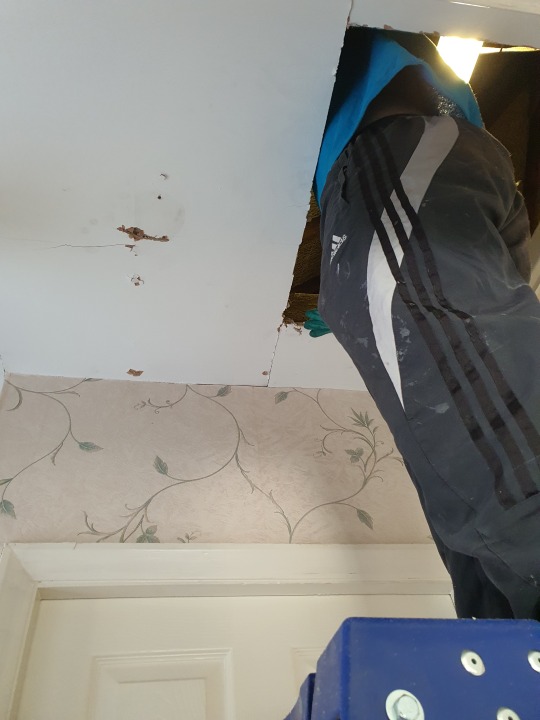
The act of cutting through the joists started to collapse the plasterboard, so we pushed it through and left it to one side.

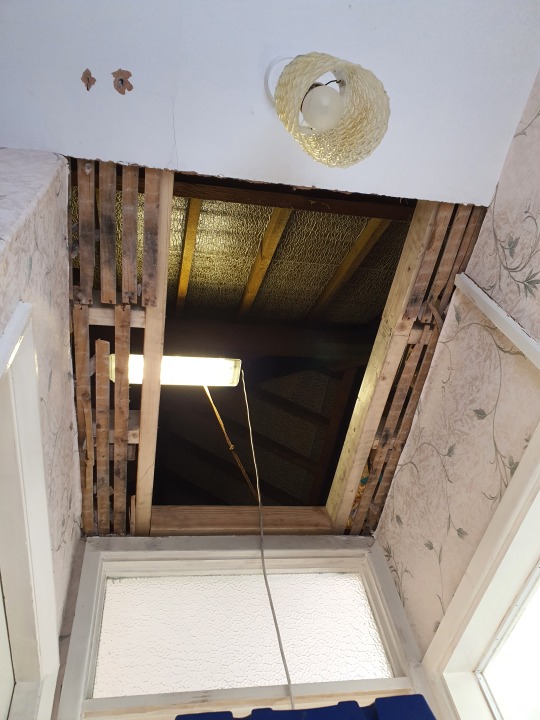
From there, we measured, made a note, and then measured again to make sure we have enough new joist CLF to make the frame of the hatch. I bought about 50% more than we actually needed, which turned out to be essential as one of the pieces of CLF was twisted, and when we cut it to size and put it in place against the original joists, it did not sit where we needed it to. So we had to trim the twisted piece, cut from the other piece I bought, and then but the two sections up against each other and secure them to an original joist (see the right hand side CLF joist in the below image - it is in two halves).
Initially, I wanted the ladder to pull down and into the spare room, however when we initially fit the hatch into position, spaced it away from the new joists, and opened the hatch, the ladders wouldn't swing past the top of the door (see the glass panel in the image above). This resulted in us removing the spacers and screws into the new frame, lifting it up into the loft, spinning it around, and then dropping it back into position in the other direction.
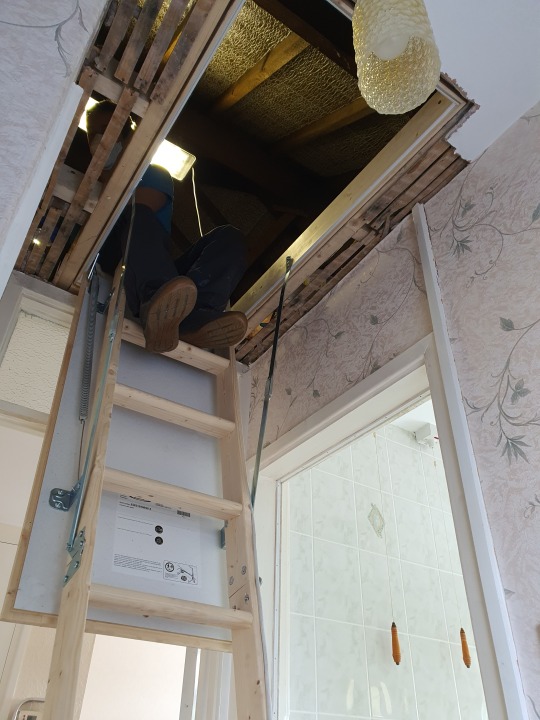
This worked, but with two caveats: a) the ladder swings out onto the stairs, which is a bit dangerous when you are carrying heavy items. b) the ladder swings into the light fitting, so I'll have to fit some sort of spot light or shortened light fitting in future to avoid smashing the current one in frustration.
After 6ish hours of getting hot and sweaty wrestling wood in a confined space into tight positions - i know how that sounds but it was definitely not as fun as you're thinking - the hatch was in place and secure.

All that was left was to tidy up. I lost the pole that came with the kit to open the hatch, so temporarily I planned to use my crowbar. Long term I will print something on my printer.
The plasterboard that was around the hatch was no good, so my brother (who's a plasterer by trade) has said he can sort it.
The next day...


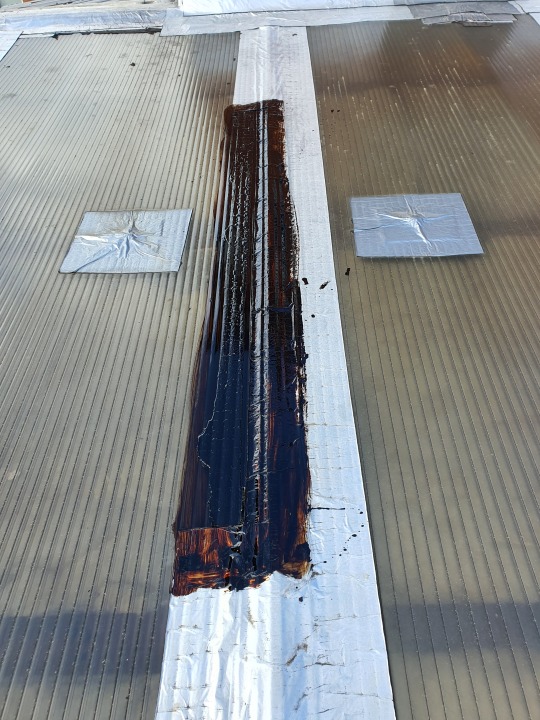
I was in the garden and noticed the flash band on the living room roof had peeled up in another location. Fearing the impending storm, I got back up onto the roof and hastily cut away the old, peeling flash band, cleaned it up as best i could, applied some flash band glue, and then put a fresh piece in its place.

The tape is not completely straight, and it does sit on a small area that i didn't apply the glue to (i underestimated the thickness but did clean the area), however it sealed tightly after being pressed down and had about 2 hours of direct sunlight to set in before the wind and the rain came bounding down.
Whilst this patch seems to have held, somewhere else appears to have given up, as later in the evening a leak made its way into my living room and started pooling in the doorway between the kitchen and the living room.
Ironically, I had a guy out in the week to price up a new roof - in short, building regulation in the UK prohibits building an extension without prior permission, and one of the ways to circumvent that is by making the roof of a non-fixed construction. In this case, the roof resembles a series of polycarbonate sheets taped together, not a fixed, solid roof. Upgrades include replacing with glass panels (which is fine until the sun comes out and you make a room sized furnace) and aluminium panels like the image below (which offer the best in terms of noise cancellation from the rain, insulation from fluctuating temperatures, and longevity)

To have an aluminium roof, I'd be looking at spending around £16k, which I just don't have at the minute. Even taking a loan would be unreasonable, as over a 5 year term I'm looking at paying back almost as much as my mortgage. My mortgage is already a quarter of my salary, so its not even an option.
Tomorrow I'll get back up there and seal the entire top section with emergency sealant: its going to look awful for a while but Id rather that than have a small swimming pool ruin my living space...
0 notes
Text
JOURNEY TO CREATING OUR PRODUCT
Welcome to this blog about our journey into creating our product for our class Entrepreneurial Mind. Throughout this blog, it will talk about how we thought about the product that we will be showing for our product pitching. We were tasked by our instructor to interview 100 people but he suggested interviewing at least 25 people to gather information so that we could create our blogs.
So, on February 1, we decided to start our interviews since even though classes were suspended, we still had tried our luck if there were going to be students around the school luckily there were students around the market, grandstand, and Fullbright.

For our first set of interviews, we managed to interview 25 students,
and here are their responses:
Printing
As students it's natural that we would need something to be printed, from printing assignments, worksheets, or notes, it’s a service that a lot of students don’t have access to quite easily since one of the many places that students go to print is the market. While the service already exists in the market, the distance from different colleges is something to note.
Slow internet / No internet
Access to the internet is quite important as it is used to search for topics, scroll through to pass the time, or chat with others.
Transportation
One reason why this has become an issue is how motorellas would take the students on a "world tour" when trying to get to the location they need to go which in turn makes the students late for their classes.
Environment
A problem under this topic would be the garbage that would occasionally be seen around the school from plastic cups to leaves, while the leaves can very well decompose around the ground, plastic cups, or anything that is non-biodegradable is harmful to the surrounding areas and in general it does not look nice.
Distance to Market
The market is the student's usual go-to place to eat, while there are respective canteens of each college, the pricing of canteens can be slightly expensive.
So between all of these problems, we decided to tackle the printing problem as it is something that we as students can do since each problem is either something that we can’t control like transportation and the distance to the market, regarding the problems of the distance to the market while we could very well open a store but that would be competing to the canteens and the entire thing isn't particularly sustainable for us in the long run. While the problems of the environment can be solved in another way, another group could very well think of another idea on how to deal with the garbage.
While printing is also very common and I'm sure previous students who have taken this subject before have tackled this problem, for this case we wanted to remove the human aspect of printing and by that, we mean by having printing stations in each college where students can connect their phones to the Bluetooth of the printer to be able to print and having to pay accordingly to print.
As of now, that is our current idea to solve this very problem, currently, we’re still refining the very idea of printing stations, from the programming aspect of it, the size of the box that will fit the printer and the paper, and the funding for our prototype but for now we will tackle those problems once our product will be approved for the pitching.
1 note
·
View note
Text
Games Research
Doing this now so I can focus on other things later.
Terraria is the first game I'll cover. Its art style, while immediately seen as "simple" from the fact that it is pixelated, is actually rich with detail. There are loads of variations for even basic dirt textures, accounting for whatever kinds of slopes and ridges can form when building or digging. Little insects fly about the screen, backgrounds scroll smoothly with little details like chinese lanterns and several transitory sub-biomes that the screen will change to when moving between regions. The colour palette is used to its fullest as you literally travel to Hell and back, going into multiple biomes with totally different aesthetics and colourings. This creates a good feeling of exploration, cementing Terraria as a fantasy game, with a reasonably fantastical setting to boot. It doesn't claim to be realistic, therefore it can go totally overboard with its world design.
Dave The Diver is a game I've seen on Steam, and supposedly it's quite good. Looking into it, it's got some great art direction. The deep blues of the ocean contrasting with the colourful coral bring me right back to my days of playing Subnautica in early 2019. The level architecture itself slips into the blocky, minimalist niche that Minecraft undeniably carved out, but there's something interesting going on with the depth of the game world (no pun intended). I think perhaps it uses voxels, which is always cool, though not a look that fits every game. Dave seems to control very snappily, instantly clipping to a position instead of smoothly moving to it. The way you catch fish in this game, lining up a target with a speargun before reeling it in with a quick-time event is very cool. As previously detailed, I planned a harpoon gun for TWL, but removed it. The weapon works very well in the world of Dave The Diver, as the titular diver is small compared to the level environment, hence aiming is more important.
Eternal Castle - Now this is a very interesting game, mostly as it claims to be a remake of an old 80s game that never existed. This one is relatable to me on several levels; I often watch MandaloreGaming videos on forgotten adventure games such as Limbo Of The Lost, made even stranger by Mandalore's tendency to add or remove sound effects from his videos, blurring the line between what is actually part of the game, and what's an editing trick utilized to mess with the viewer. Second thing, the artstyle. I couldn't quite explain it at first, but then it suddenly clicked. This game has "printer ink visuals", it only uses cyan, yellow and magenta primarily, and then combines them to make other colours that show up regularly like black. It's absolutely unique, and is just the sort of thing a low-budget 80s game might do to get around system restrictions. There are other interesting myhouse.wad-esque ARG elements within the game files, but that's not massively related to what I'm researching. From what I understand, the gameplay is mostly combat-related, resembling something akin to Prince Of Persia though considerably more minimalist. The animations and gunplay lend themselves to the kind of silhouetted rotoscoped nightmare fuel popularised by FAITH, and definitely creates a kind of uncanny fear expressed through a being your mind can't distinguish as a human: all you know is, it moves like a human, you can't see a face, and it's running towards you. The idea of not knowing being scarier is exacerbated through the anachronistic storytelling performed through the files released in preparation for the game.
1 note
·
View note
Text
Week 6 DES302 Capstone
The first term of my capstone project is done! 6 weeks in, and I'm pretty happy with my progress so far. I’ve stuck pretty closely to my Gantt chart plan, although my scope has decreased slightly with removing the ball concept and development. Instead, I’ve focused more on creating multiple stud prototypes that offer different ideas for the same outcome (habitat regeneration). I spent most of this week gathering materials and creating prototypes, which I thoroughly enjoyed. I was able to work alongside the FabLab technicians to create a scaled-up 3D model of my mechanical stud concept, as well as discuss and create clay-based seed bomb studs through advice from the head of the UoA pottery department. Going into the mid-semester break, I’m confident with what I’m creating and hope these two weeks can be used productively for testing and further prototyping.
Once again, I’ve asked CARL to help me write this reflection, he’s really becoming a valuable friend to have around. Starting with the context stage, this week was a key milestone in my capstone project plan, focusing on gathering materials, prototyping, and testing. Along with this, I planned to research permit permissions around using green urban spaces in Auckland. I wanted to create multiple physical prototypes that allowed me to get a proper feel for my ideas and also test them in hand.
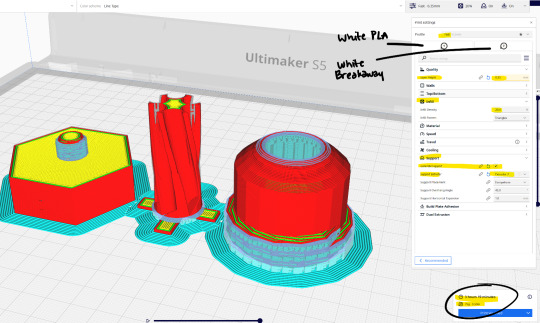
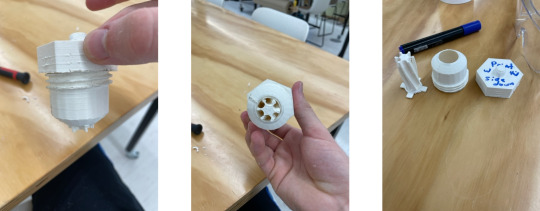
To make this context a reality, I spent a lot of time researching production methods, crafting, driving, and spending (yuck). I developed physical prototypes for both of my stud ideas, with the mechanical twist-stud concept being scaled up three times and 3D printed in the FabLab. I scaled the mechanical model up because it allowed me to better see any flaws in my design, as well as reduced the risk of structural instability from 3D printing something so small. The 3D model was created using white PLA and breakaway through a .8 nozel with a triangular print pattern. These settings were chosen due to the increased printing speed and availability of material. The .8 nozel allows more material to be applied, thus decreasing the printing time, while also increasing the strength of the print. The triangular print pattern was chosen for the same reasons. These settings were then applied in a program called Cura and were transferred to the UltiMaker printers in the FabLab through a .3mf file. Cura was a fantastic tool for this, it provides a view of what your print will look like within the printer, how each layer will be printed, what materials will be used, etc. The natural seedbomb stud idea was created from a combination of bee pollinator seed mix, 100% green waste compost, and air-dry clay after a discussion with Steve from the FabLab and Franca from Pottery. The bee pollinator seed mix was used due to its wide variety of supplied seeds, which are all non-invasive, benefit my target demographic, and require minimal care to grow. 100% green waste compost was used to reduce any risks with handling, as compost that also incorporates organic waste can be dangerous to touch. Air-dry clay was used due to its natural malleability and neutrality with my chosen seeds and compost. To make these seedbomb studs, the first thing I did was create a mold of a pre-existing football stud. I created this mold from a mixture of flour, water and salt, which formed a dough that I imprinted the stud into before baking. This allowed me to create a mold with materials I already owned and was a fast and cheap solution that was also highly effective when it came to creating my seedbomb studs.
This resulted in Week 6 being a lot of fun, extremely valuable and productive. I really enjoyed being in the FabLab heaps and spending hours touching up and testing my 3D model. I also found molding the seedbomb studs to be quite therapeutic. Having physical prototypes to iterate and test over the holidays is something I set out to achieve from day one when I created my Gantt chart, and to have this done is a massive weight off my shoulders. Furthermore, the results of my prototypes have been really positive. They work as I intend them to, and with some fine-tuning, I think I’ll have fully functional high-fidelity prototypes done sooner rather than later.
On the learning side this week, I found being able to hold and play with my prototypes taught me a lot, both about the values of prototyping and what iterations were needed for my project to progress. Along with this, I continued to learn the benefits of an achievable plan and sticking to said plan, alongside the gratification and achievement one feels from this. On the practical side, I learnt how to deal with clay, how this can be used alongside molds, how to import files into Cura and export them for 3D printing, what the settings within Cura do, and the painstaking process of land permits in Auckland. Overall, I’m pretty happy with how Week 6 went, and the only thing that’s upsetting me with this assignment is that half of the allocated project time is up!
Here are some photos of my prototyping process and my prototypes :)

#prototype#design#seeds#3D modelling#Cura#Seedbombs#clay#materials#testing#molds#prototypes#prototyping
0 notes
Text
AI Generates Perfect Photos Every Time!
Introduction:
Many people are interested in the potential of AI for photo editing and art. With the increasing popularity of Instagram, it seems like there’s no stopping anyone from trying this technology. However, without looking into how AI is being used currently for photo editing, it’s difficult to know what the potential applications may Ai Image Generator be for the future. In this article, we will take a look at how artificial intelligence is being used to generate perfect photos every time!
How AI Could Revolutionize Photo Printing.
1. Many photo printers today use manual processes to print photos. Manual printing is time-consuming and often results in poor prints.
2. Some photo printers use automatic processes that create perfect photos every time. However, these systems are not always reliable, so it’s important to be sure you are getting a good print before making a purchase.
3. There are many ways to improve the reliability of automatic photo printing systems. One way is to use AI to help improve the process by analyzing photos and identifying potential problems early on. This will help ensure that your photos are printed perfectly every time.
How AI Could Improve Photo Editing.
1. Use machine learning to learn how people look in photos and create realistic looking photos.
2. Use machine learning to learn about your subject and make the photo more high-resolution for better clarity and contrast.
3. Use machine learning to improve the accuracy of color grading in photos by analyzing the colors of people in the photo and adjusting them according to their skin tones.
How AI Could Create Perfect Photos Every Time.
There are a few ways that AI could help you create perfect photos every time. One way is to use machine learning algorithms to analyze your photos and learn how to produce the best images based on the pose, lighting, Ai Generated Images and other factors. Another way would be to use facial recognition software to identify specific faces in your photos and generate corresponding images. Finally, AI could help you choose the right shot by analyzing how your subjects look in different poses and settings. By taking these steps, you can make sure your photos have the perfect composition and feel.
How AI Could Help You Save Time in Photosynthesis.
Photosynthesis is the process that produces organic molecules from inorganic matter. To produce these molecules, photosynthesis requires light energy and carbon dioxide. In order to generate this light energy, This Person Does Not Exist photosynthesis uses an enzyme called RuBisCO. RuBisCO is a protein that catalyzes the step of photo-reduction.
RuBisCO can be generated by AI in two ways: by scanning a digital photo library with tags that correspond to different colors (or wavelengths), or by automatically detecting certain light signals and translating them into photo energy.
If you want to use AI to help save time in photosynthesis, first you’ll need to create a digital photo library with tags that correspond to different colors or wavelengths. This will allow your AI robot to detect specific light signals and convert them into photo energy. Then, you’ll need to use this energy to create organic molecules from inorganic matter.
How AI Could Help You Perfect Photos.
1. Begin by using photo editing software to crop and remove blemishes or distractions from your photographic subjects.
2. Use AI to analyze your photos and create perfect images that are both unique and capture the personality of your subject.
3. Use online services like Instagram, Snapchat, or Facebook to share your edited photos with friends and followers.
4. Finally, take advantage of photo printing services that offer low costs and high-quality prints.
How AI Could Improve Photo Editing.
AI could help improve photo editing by removing blur and artifacts, removing glare and reflections, improving contrast, and reducing unnecessary detail. Additionally, AI could help create photos that are more accurate and consistent across different devices.
Conclusion
There are many potential applications of artificial intelligence in photo printing and editing. By improving image quality, removing blur and artifacts, removing unwanted details, improving contrast, and more, AI could help you create perfect photos every time. Additionally, by using AI to help you improve photo editing, you can remove any inconveniences or challenges that may come with using traditional photo printing techniques. In the end, with the right application of AI in photo printing and editing, anyone can create beautiful photos at home.
0 notes
Text
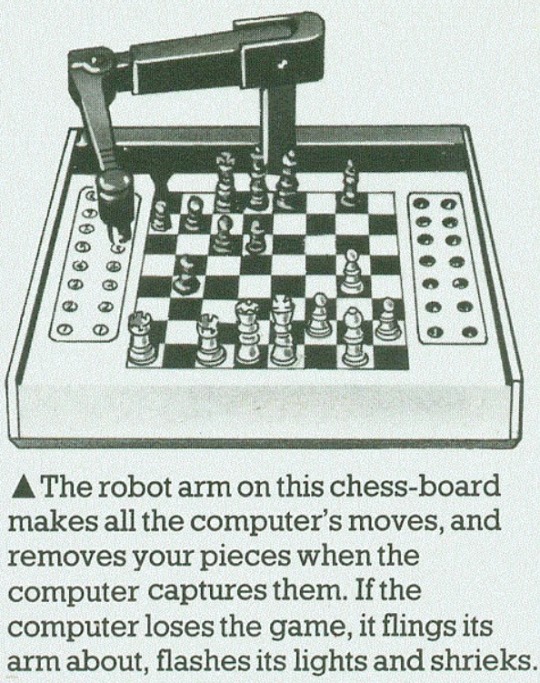
[start id: a black and white drawing cropped from p.29 of the Usborne Guide to Computer and Video Games (1982). The image shows a chessboard with lights and mechanical arm built in.
Image caption reads: "The robot arm on this chess-board makes all the computer's moves, and removes your pieces when the computer captures them. If the computer loses the game, it flings its arm about, flashes its lights and shrieks." end id.]
I assumed this emotionally dysregulated chess robot was just a 1980s fever dream, but apparently it exists, and glories in the name of "The Novag Robot Adversary":

Quoth the gorgeously Web 1.0 (but still updating in 2023?!) Chess Computer UK:
The Novag Robot Adversary is the most iconic of chess computers. There are several reasons. Firstly, for a product of 1982, its startling futuristic appearance. Secondly the robot arm which in terms of robotic character, comparative speed and range of movement is extraordinary for a consumer product. Thirdly the variety of functions - including autoplay, automatic setting up of the pieces for a new game, trace and review, best move, sound, lights, printer support, and not forgetting the tantrums produced by the ‘emotions’ button which involve waving of the arm, flashing lights and noisy sound. These functions all contribute towards a very impressive and entertaining machine, which was outstanding when it was first sold, and has not been bettered since.
That page also has videos of the machine in action, including this heart-rending footage of it losing its shit:
I am inordinately happy to learn about this.
#usborne#technology#history#gaming#gigantic mood#or something#original content#robit#my heart#murderbot#stabby the roomba#why was i programmed to feel pain#they're doing their best#i heart the internet#swears#no copyright intended
5K notes
·
View notes
Text
No, Adobe and Pantone don't "think they can own colors and charge you to use them". No, Stuart Semple's "liberated colours" don't solve any problem. No, Adobe isn't going to lock you out of your files if they happen to have any colors in them that are in Pantone's books. That's not how any of this works.
Pantone doesn't own colors. They own the Pantone Matching System, which is a system for designers and the people who turn those designs into end products to all be on the same page about what color something should be. It's essentially a more complex and extensive version of what happens when you pick out a paint swatch and someone mixes up that color for you.
There's nothing new about Pantone charging exorbitant amounts for their products. Pantone's color books—which are essential because knowing what the color will look like in physical form is the whole point—infamously cost hundreds of dollars. They can charge that because Pantone is the color matching standard agreed upon by multiple industries, from print publishing to fashion. Everyone uses it, because everyone else uses it, and because it works.
Yes, that unfortunately means that a lot of people have locked themselves into using something owned by a single corporation, and if they ever decide they want out, it would be massively inconvenient at best. That's a huge problem that isn't limited to this situation (see also: Adobe) and doesn't have a simple solution.
Stuart Semple's "liberated colours" palette, that he's hyping as Pantone colors but free, doesn't address this problem at all. Nor does it solve the immediate problem facing people who actually professionally use Adobe's existing features for incorporating Pantone compatibility into design files.
Because that is the actual issue here: Currently, you can specify your colors in e.g. InDesign as specific Pantone colors, and that information can be used when your file is turned into a physical product to get the exact colors you asked for. This works only because, again, you and the printer are both using Pantone's system, which tells you what the color will look like and tells them how to make it look like that.
Adobe removing those palettes doesn't mean you can't use any Pantone colors. It means you can't automatically specify them as Pantone colors in your file. And that means, when someone produces your designs, they don't have the Pantone system to tell them exactly what physical colors to use. That's it.
Semple's palette doesn't fix this problem, because it's just a palette. It's not part of any larger system that ensures colors are faithfully reproduced in the end products. It's just a set of colors that are similar to some of Pantone's colors. It's no different than using the color picker, or a palette you downloaded somewhere else. It doesn't have any effect on what gets printed, which is the whole reason anyone uses Pantone at all.
I know people love the story of Semple and the other guy and the black paint, and/or the other side of the story where he's actually the villain, but none of that matters except for this context: Semple's whole brand is "liberating" colors from these evil millionaires and corporations who want to control them, etc. I like to think that he has a basic grasp of what Pantone is used for, and if so, he knows his palette doesn't solve the problem. It's just a promotional stunt. It's not inherently a scam or anything; but the idea that he's giving you back something Adobe and Pantone took from you is complete nonsense.
1K notes
·
View notes